MakerBot 3D-PO: Difference between revisions
No edit summary |
|||
| Line 31: | Line 31: | ||
First and foremost, you should be able to run ReplicatorG, Skeinforge and Blender without errors (ReplicatorG will throw some errors if not connected to the bot) | First and foremost, you should be able to run ReplicatorG, Skeinforge and Blender without errors (ReplicatorG will throw some errors if not connected to the bot) | ||
==Test Cube== | ==Test Cube== | ||
This will walk you through getting a very basic STL file from Blender so you can test your setup. | |||
===Blender=== | |||
# Open Blender - you should have a default cube (Advanced users may not, this is all defaults) | |||
# Resize the cube - press the 'n' key, and click 'Link Scale' Change DimX to 30.000, Press Enter | |||
# Click File, Export, SLT... | |||
# Change untitled.blend to testcube, and click the Export STL button - this save testcube.stl to your home directory | |||
You have an STL that Skeinforge can understand, proceed! | |||
===Skeinforge=== | |||
Not that you have a testing model exported to STL format from Blender, it's time to turn it into gcode. | |||
# Open skeinforge | |||
cd ~/MakerBot/skeinforge | |||
python skeinforge.py | |||
Assuming you're following all the directions here, you should be ready to continue. There are a few checks you should do first however: | |||
# Click the Analyze button | |||
# Click the Behold button. Make sure Activate Behold is '''unchecked'''. Save Prefs | |||
# Click Close | |||
# Click the Fill button | |||
# Make sure the Infill Solidity (ratio) is set to 0.1, and click Save Preferences - ''these are just test settings, and will be explained later.'' | |||
Time to import | |||
# Click Skeinforge on the lower left | |||
# Browse to where you saved testcube.stl, highlight and click open. | |||
# Get some beer - This will take some time. | |||
If all is going well at this point, you'll see something like this in the terminal: | |||
[fynflood@solanum skeinforge]$ python skeinforge.py | |||
File /home/fynflood/testcube.stl is being chain exported. | |||
There will be more output when it's done, including the path to the newly created gcode. | |||
=Operating Instructions= | =Operating Instructions= | ||
Revision as of 01:00, 9 September 2009

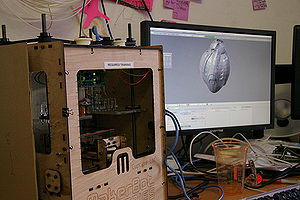
Our MakerBot is named 3D-PO and is a bog standard MakerBot 'Batch 5' Model. We print things.
Printing with 3D-PO
Each MakerBot is a bit diffent, since they are hand assembled. This is a how to for our specific MakerBot
First time printers
Take the class, or have someone at the space teach you 1) Download 007 version of ReplicatorG from : http://code.google.com/p/replicatorg/downloads/list 2) Unzip or unpack the package 3) If you have not used a USB FTDI cable before (or don't know what one is) you need to install drivers for them. Go into the ReplicatorG/Drivers folder, and install the right driver (Intel or PPC, be careful) for an FTDI cable (a USB cable that connects to embeded devices, like MakerBot).
Software
MakerBot specific:
ReplicatorG - The MakerBot's IDE Skeinforge - Converts STL to ReplicatorG sketch (I think).
3D
Any 3D Rendering software that can export to .stl will work Blender is a good Open Source/Cross Platform 3d app.
Setting up Your Environment
Linux
(Dependencies are beyond the scope of this doc - If you can run the Arduino IDE, and have python installed, you should be set) This is what works at the moment. We'll probably put all of this into git or something pretty soon Download MakerBot.tar.gz
- This is ReplicatorG, Skeinforge and JMil's files, known to work as of 09/08/2009
cd ~/
wget http://www.hive76.org/MakerBot.tar.gz
Untar it:
tar -xzvf MakerBot.tar.gz
Assuming your deps are up to snuff, you're all set.
OSX
How to test that it's all Working
First and foremost, you should be able to run ReplicatorG, Skeinforge and Blender without errors (ReplicatorG will throw some errors if not connected to the bot)
Test Cube
This will walk you through getting a very basic STL file from Blender so you can test your setup.
Blender
- Open Blender - you should have a default cube (Advanced users may not, this is all defaults)
- Resize the cube - press the 'n' key, and click 'Link Scale' Change DimX to 30.000, Press Enter
- Click File, Export, SLT...
- Change untitled.blend to testcube, and click the Export STL button - this save testcube.stl to your home directory
You have an STL that Skeinforge can understand, proceed!
Skeinforge
Not that you have a testing model exported to STL format from Blender, it's time to turn it into gcode.
- Open skeinforge
cd ~/MakerBot/skeinforge
python skeinforge.py
Assuming you're following all the directions here, you should be ready to continue. There are a few checks you should do first however:
- Click the Analyze button
- Click the Behold button. Make sure Activate Behold is unchecked. Save Prefs
- Click Close
- Click the Fill button
- Make sure the Infill Solidity (ratio) is set to 0.1, and click Save Preferences - these are just test settings, and will be explained later.
Time to import
- Click Skeinforge on the lower left
- Browse to where you saved testcube.stl, highlight and click open.
- Get some beer - This will take some time.
If all is going well at this point, you'll see something like this in the terminal:
[fynflood@solanum skeinforge]$ python skeinforge.py
File /home/fynflood/testcube.stl is being chain exported.
There will be more output when it's done, including the path to the newly created gcode.