Laser Class: Difference between revisions
No edit summary |
|||
| Line 57: | Line 57: | ||
Glass can be engraved with some success as the laser finely fractures the surface of the glass. The anodized surface on anodized aluminum can be engraved away. Experimentation is encouraged with appropriate supervision. | Glass can be engraved with some success as the laser finely fractures the surface of the glass. The anodized surface on anodized aluminum can be engraved away. Experimentation is encouraged with appropriate supervision. | ||
==Class slides== | |||
[https://docs.google.com/presentation/d/1r6z7-SlRe7Wp6PAhoS9g-xQuOx3zoEJM0K3tHy_LJLY/edit?usp=sharing Here are the slides from the 2/2/2017 class] | |||
Latest revision as of 00:07, 3 February 2017
This is the content for Hive76's introduction class to laser cutting.
In this class we will cover the following:
Laser basics
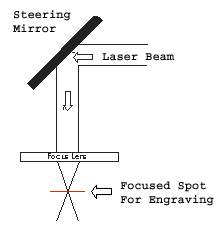
Our laser cutter uses a 45W CO2 glass laser tube. The laser works by exciting CO2 atoms that release infrared light a.k.a. heat. These Infrared photons bounce back and forth inside the laser tube between two mirrors. Once they get to a specific power level, they exit through one mirror, travel through a series of mirrors, and are focused to a point. See the laser diagram on the right.

This laser energy is put to use by focusing all 45W of this infrared heat into a single point. This heat is used to vaporize your material as quickly as possible and exhaust fans are used to pull the material out of the environment. problems with laser cutting arise when the material absorbs this heat too slowly. Then the material will melt or burn instead of vaporizing.
Laser capabilities
Our laser cutter can cut and engrave on many materials using designs of almost any shape. Laser cutters are the most popular example of digital manufacturing. Digital manufacturing relies heavily on CAD tools, digital production files, and automation. If done properly, digital manufacturing lowers setup costs and shortens prototyping cycles. This makes rapid design iterations possible.
Because of the low setup cost, custom designs are easy. You CAD file can be drawn in a way to easily accept custom dimensions or decoration. The automation also allows very complex designs to be within reach of anyone. The laser can cut a straight line or complex curved line with little difference. If the robot is cutting it for you, then complexity is free! This allows for interesting structures like living hinges cut from plywood.
Three operations
Laser cutters have three distinct operations that you can design for:
- Raster Engraving
- Vector Cutting
- Vector Scoring
See the physical example available for this class to a real clear view of these three operations.
Raster Engraving
This is when a laser travels across a large area of the material removing a small amount of material from the top surface. This is generally for decoration and text marking on a design. You can also use grayscale images for input to engrave photos on material. Some materials darken when engraved, and some lighten. Experiment first.
Vector Cutting
This operation is used for cutting material to shape and size. The input for this operation needs to be vectors. Vectors are scalable paths that are output from CAD programs, Adobe Illustrator, or Inkscape. Keep in mind while designing that you will be separating your material into pieces. So, a line of text will become a jumble of cut letters without some element connecting them.
Vector Scoring
Vector Scoring is halfway between vector cutting and raster engraving. It uses vectors for input, but a much lower power setting than needed for cutting. This allows for thin decorations to be engraved onto the surface. Because raster engraving links time to etch to overall area, vector scoring will be a much faster way to engrave a single, thing circle onto your material.
CAD setup
Each of the three operations above need a different type of input to differentiate them in the laser software.
Raster Engraving
Any black and white image. The output of the laser will be binary: either engraved or not. Inputting a grayscale image will include a bitmap halftoning process. If you want better control over the output, you can create your own halftone bitmap in Photoshop or GIMP. The time to raster engrave a design is tied to the overall area of the image.
Vector Cutting
Vectors used in vector cutting need to be output as paths with zero fill, and thin stroke. A stroke weight of .1pt or smaller usually works. Use the color red (#ff0000) to distinguish cut vectors.
Vector Scoring
Vectors used in vector scoring need to be output as paths with zero fill, and thin stroke. A stroke weight of .1pt or smaller usually works. Use the color blue (#0000ff) to distinguish score vectors.
Materials
There are more prohibited materials than acceptable ones. Here is a short list of acceptable materials:
- Wood
- Paper
- Cardboard
- Acrylic (PMMA)
Many more materials are possible, but there is a specific restriction on any material containing chlorine. That includes anything label "vinyl" as it is usually PVC, Poly Vinyl Chloride. Vaporizing chlorine in the laser produces hydrochloric acid, which is bad for the machine and the operator.
Quality is hard. Poor quality plywood can be a pain to cut.

Some materials will absorb the laser energy too quickly and melt, others will not vaporize at all and can't be cut.
These materials cannot be cut:
- Polycarbonate
- ABS Plastic
- PVC
- Vinyl records
- Metal
- Glass
Glass can be engraved with some success as the laser finely fractures the surface of the glass. The anodized surface on anodized aluminum can be engraved away. Experimentation is encouraged with appropriate supervision.